


Breath alcohol content detector
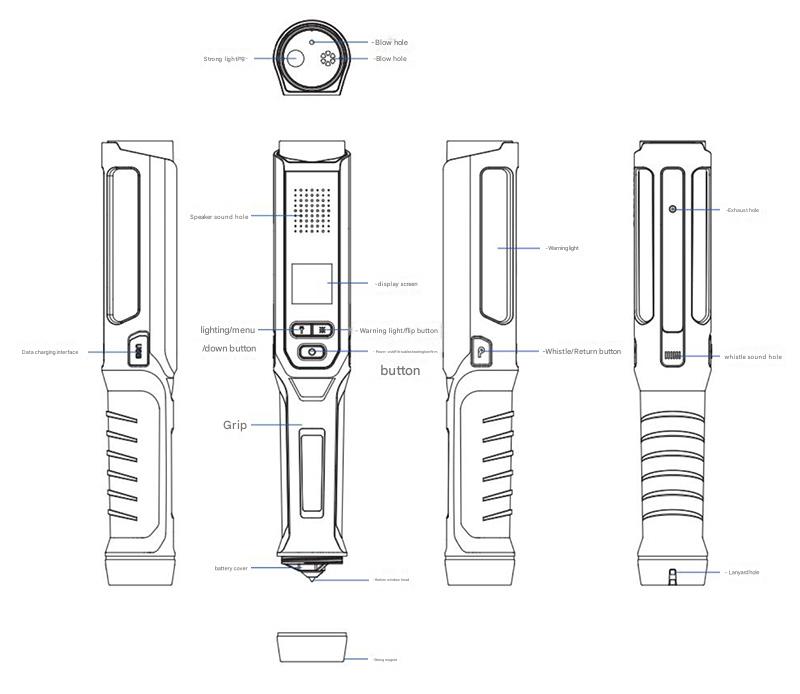
I. Appearance Diagram and Button Description
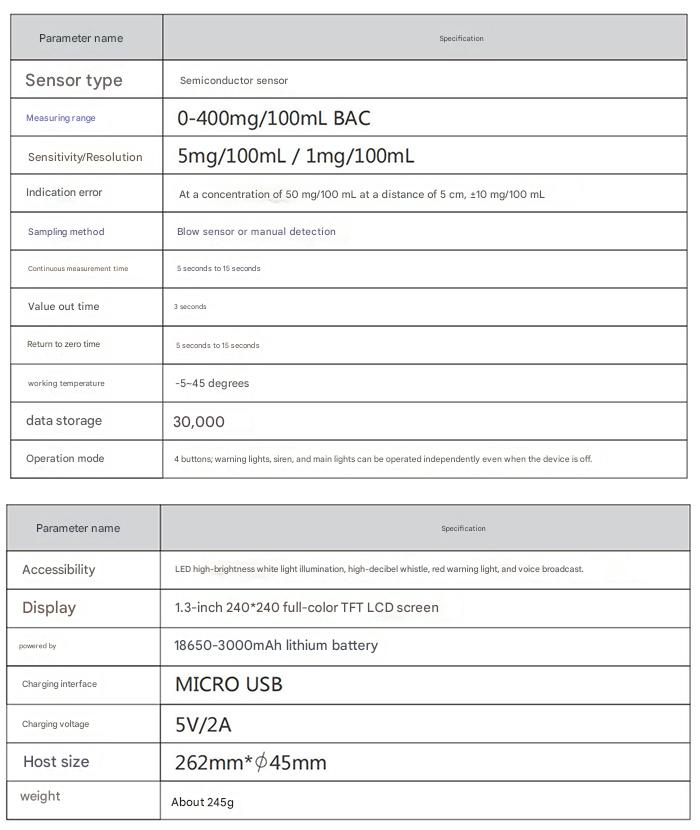
II. Specifications
III. Instructions for Use
Before use, please check that the batteries are installed correctly. Unscrew the battery cover counterclockwise, insert the batteries into the battery compartment according to the positive and negative terminals, and tighten the battery cover clockwise.
I. Alcohol Concentration Detection
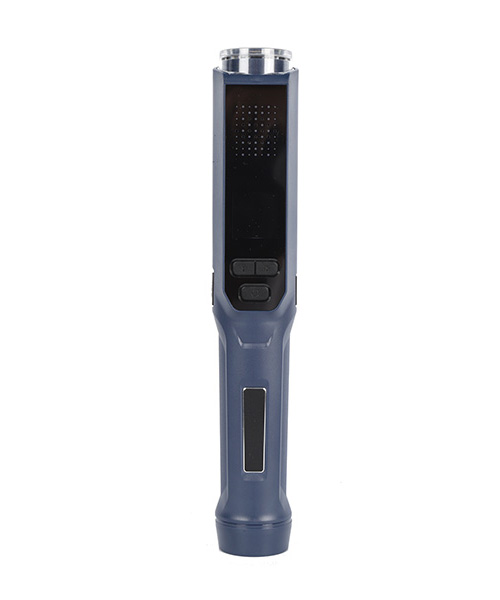
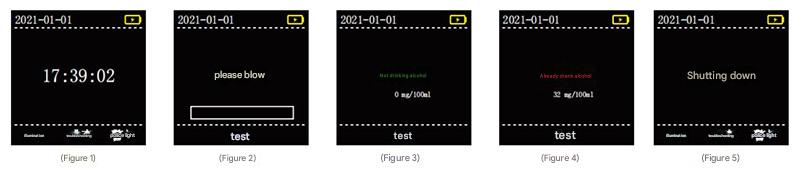
Press and hold the "Power On/Off/Check/Confirm" button for 2 seconds to turn on the machine. The screen will display the power-on screen (Figure 1).
Press again briefly. The voice prompt will say "Device preparing, please wait patiently" and "Please blow into the air." The screen will display "Please blow into the air" (Figure 2). After blowing into the air for 2-4 seconds:
A. If no alcohol is detected in the sample, the voice prompt will say "No alcohol consumption, thank you for your cooperation," and the screen will display "No alcohol consumption" (Figure 3).
B. If alcohol is detected in the sample, the indicator light will flash red, and the voice prompt will say "You have been drinking and driving, please cooperate with the inspection." The screen will display "Drinking alcohol + alcohol concentration (00mg/100mL)" (Figure 4).
After powering on, press and hold the "Power On/Off/Check/Confirm" button for 3 seconds to turn off the machine. The screen will display the power-off screen (Figure 5).
Note: It is best to turn off the baton and flashlight when conducting alcohol concentration tests to avoid unnecessary visual interference to the person being tested.
II. Baton Operation: Briefly press the "Warning Light/Scroll Up" button to turn the baton on continuously. Short presses cycle through the options: continuously lit, flashing, off.
III. Flashlight Operation: Briefly press the "Light/Menu/Scroll Down" button to turn the flashlight on continuously. Short presses cycle through the options: continuously lit, flashing, off.
IV. Whistle Operation: Briefly press the "Whistle/Return" button; the machine will beep once. Long press the "Whistle/Return" button; the machine will beep again...
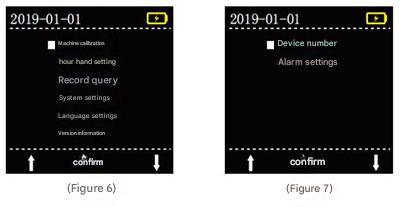
V. Menu Settings: With the device powered on, long press the "Light/Menu/Scroll Down" button to enter the menu settings interface. Use the "Light/Menu/Scroll Down" and "Warning Light/Scroll Up" buttons to navigate up and down. Use the "Power On/Off/Troubleshoot/Confirm" buttons to confirm. Briefly press the "Whistle/Return" button to return to the previous screen.
You can configure or view eight menu items: "Machine Calibration, Clock Setting, Record Query, System Settings, Voice Settings, Version Information, Device Number, and Alarm Settings".
VI. Window Breaker
Screen the window breaker cap counterclockwise to open. The window breaker can be used in emergencies.
VII. Magnet
The handle has a magnet at the end, allowing the device to be attached to metal.
VIII. Charging Operation
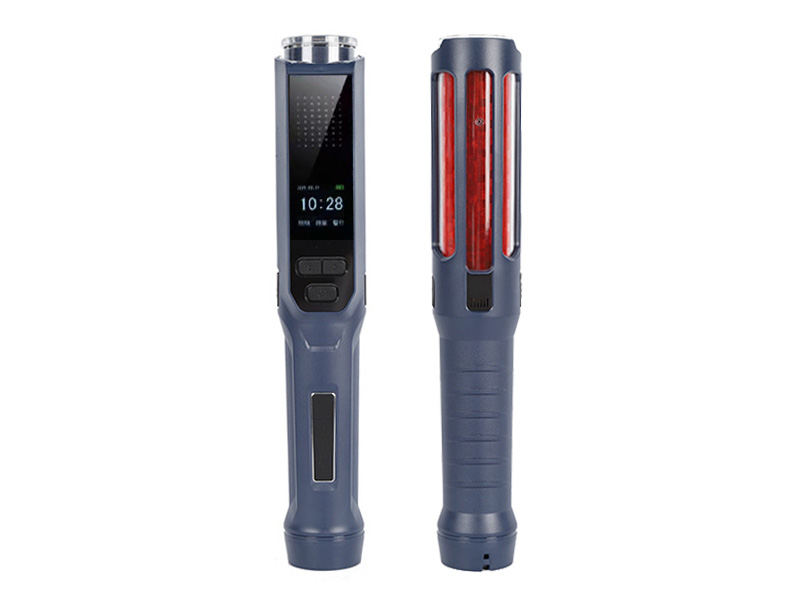
Use the included adapter and USB cable to connect to the device's USB port for charging. The display screen and red indicator light on the head will illuminate during charging. A full charge takes approximately 3 hours.
IX. Applications
The breathalyzer is suitable for traffic police to quickly detect drunk driving. It can also be used in government agencies, mining and transportation companies for inspections in hazardous work areas, and for drunk driving prevention in entertainment venues.
X. Product Function Description
The breathalyzer uses a rapid detection method, continuously extracting the breath of the person being tested to quantitatively or qualitatively determine whether the person has consumed alcohol. The instrument can analyze and determine the result within 3 seconds. The instrument has extremely high sensitivity, minimizing the possibility of false negatives.
IV. Precautions:
1. Prevent the machine from falling from a height or being subjected to severe vibration;
2. This product must not be stored or used in an environment containing corrosive gases (such as chlorine);
3. This product must use the original 4.35V/3000mAh 18650 lithium battery supplied by the manufacturer, and the battery must not be placed in a high-temperature environment;
4. Please use the power adapter supplied by the manufacturer when charging. Using a power adapter not supplied by the manufacturer may damage this instrument.


